Updates
- October 21, 2016: Updated for Vue.js 2.0
Vue.js is a JavaScript Library that makes building web applications easy and reactive. In simple terms, it helps you convert data objects (model) in your application to HTML (view) and binds the DOM to the underlying data so that if your data changes, the page is updated accordingly.
Target Audience
This tutorial is targeted at developers who have a reasonable understanding of JavaScript and the DOM but do not have any experience with a framework.
People who could fit into this category are:
- Anyone who can do some basic apps with HTML/CSS/JavaScript/jQuery
- Beginners who have completed the Front-End section of Free Code Camp
- Those who rely on jQuery exclusively for DOM manipulation
This tutorial is not for
-
Complete newbies to JavaScript. Please take the time to understand the core concepts first before learning abstractions. Free Code Camp is a great place to start.
-
People who already have in-depth knowledge of Vue.js, Angular.js, Ember.js, React or similar frameworks.
What we’ll be building
We will build a simple to-do list app with the following user stories:
- User can add a single to-do item at a time.
- User can delete a single item.
- User can clear the whole list.
- User can mark single items as completed.
- User can mark all items as completed.
You can view the code and a live demo of the app on JSFiddle
I’m going to explain how each feature was implemented step-by-step so hopefully you should have a good understanding of how everything works together at the end of this tutorial.
If you get stuck while working through this tutorial…
Drop a comment below or send me an email. I’ll respond to your questions as soon as I can.
Getting Started
I will be using JSFiddle for this tutorial and I will embed snapshots of each step on this page. I highly recommend that you follow along, typing each step out all the way to the end.
Adding Vue.js to the page
First, we need to grab the Vue.js file and add it to our page. There are many ways to do this but the simplest way is to load the script from a Content Delivery Network (CDN).
<script src="https://cdnjs.cloudflare.com/ajax/libs/vue/2.0.3/vue.js">
</script>
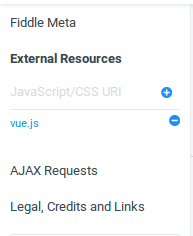
If you’re using JSFiddle like I am, paste the link to the script under External Resources and click the plus icon.
Creating the Structure
Now that we’ve added Vue to the page, it’s time to setup our HTML. We will create a main container div with an id of events and a new Vue instance and then bind the two together.
Setting up the panel
In our section element with the class panel, we will insert three new elements:
- A checkbox to mark all to-do items as completed.
- An input field for adding new to-do items.
- A button to clear all the items from the list.
The autofocus property on our input field focuses the element automatically when the page loads so that the user can begin to add items immediately without having to focus the input manually.
Setting up the list
Now that we have the skeleton for our top panel, let’s do the same for the list area where our tasks will be rendered.
Basically, each to-do item added to the list will be placed in the li tag with the label containing the text. The checkbox is to mark a single task as completed while the delete button is to remove an item from the list.
Adding the Styles
Since this article is not about CSS, I’m not going to dwell too much on this section. Feel free to copy and paste the styles.
Getting to the nitty-gritty
We can start demonstrating the awesome capabilities of Vue.js by giving our to-do app some functionality.
Before we start building our app, let’s go over the concepts we need to understand about Vue.js so that you can follow along.
The Vue Instance
We can create a new Vue instance by using the Vue() constructor function which lets you bind the data in your model to the view (HTML).
Setting the el key to #todo makes all the elements inside div#todo available to the Vue instance.
Two-way data binding using v-model
Directives are special attributes in Vuejs that you add to HTML elements. They are prefixed with v-. From the official documentation:
A directive’s job is to reactively apply side effects to the DOM when the value of its expression changes.
v-model is one such directive that is used to bind data from an input field to a value registered in our data object and vice versa. Let’s look at a quick demo of how this works:
The v-model attribute on the input field in the HTML is set to the name key we registered in the data object of our Vue instance. Now switch to the result tab and change the name in the input field. Notice that the name key is updated instantly, just like magic!
Note: I added <pre> {{ $data }}</pre> in the HTML to display the contents of the data object just below our input. The benefit of this is that it allows you to see how things are working under the hood which is helpful when debugging.
Listen to DOM Events with v-on
Vue provides another directive v-on which we can use to listen to DOM events and invoke a method when a specified event is triggered on an element.
If you use jQuery, you may have been used to doing something like this:
$("element").on("event", function () {
  //whatever
};
In Vue, the logic is similar but the syntax is far different.
Following on from the previous example, let’s add a button that will call a function that alerts the name in the input field when the button is clicked.
I added the v-on:click directive to listen for click events and call the alertName method when a click is triggered on the button. If you switch to the JavaScript tab, you will see that I have already registered alertName in the methods object.
Displaying data in Vue
Mustache-style bindings are used to display the data from a Vue instance on the page (the View). For example:
new Vue({
  el: "#demo",
  data: {
    value: "Hello, how are you?"
  }
});
To display the value property of our model in our view we need to add the ` {{ value }} ` string in our view like this:
<p> {{ value }} </p>
Here’s a proper demo:
Go ahead, change the text in the input field. You will see that the text on the screen is updated immediately. This is because the Vue links your data and the DOM together and the two are kept in sync.
Rendering lists with v-for
We can use the v-for directive to render a list of items based on an array in our Model. A special syntax is required in the form of item in names where names is the array in question while item is the current array element being iterated on.
Here’s an example:
If you update the contents of the names array, the list will also update accordingly. No need for DOM manipulation.
What is this?
this in the context of event handlers refers to the Vue instance invoking the handler and it is used to access the items in the data object.
new Vue({
  data: {
    lang: "JavaScript"
  },

  methods: {
    eventHandler: function() {
      //this refers to the Vue instance and it is used to access the lang key in the data object
      console.log(this.lang); //Javascript
    }
  }
});
Hopefully, all that makes sense. It’s time to combine the concepts we’ve learnt above to add some functionality to our application.
Feature 1 - Add a to-do item and display it on the page
The first feature we will implement in our app involves adding a single to-do item to the list through the input field in the top panel.
You will see that I’ve added two new properties to our data object:
newTask: This is where we will bind data from our input.taskList: This is an array where our tasks will be stored.
Now, we will bind the value of the input field to the newTask key by setting a v-model directive on the input field to newTask. Secondly, we will add a v-on listener to the input to watch for the enter key and call a method called addTask when it is triggered. The syntax is below:
<input type="text" placeholder="What do you need to do?" autofocus class="text-input" v-model="newTask" v-on:keyup.enter="addTask">
Finally, let’s setup the addTask method. We will register it inside the methods object as previously alluded to.
methods: {
  addTask: function() {
    //trim() is used to remove whitespace from both ends of a string
    var task = this.newTask.trim();
    //if task is not an empty string
    if (task) {
    //Push an object containing the task to the taskList array
    this.taskList.push({
    text: task,
    checked: false
    });
    //Reset newTask to an empty string so the input field is cleared
    this.newTask = "";
    }
  }
}
I hope the comments were explanatory enough. When the addTask method is called, we will get the value of newTask, trim() it and save it in a new variable called task.
If task evaluates to true, which it would except if task is an empty string, push an object to the taskList array with two properties: text is set to the task variable while checked is set to false. checked is what we will use to track the “done” state of each task.
By setting this.newTask to an empty string, the value of our input will be cleared since they are bound together using the v-model directive.
You can switch to the results tab and add a few to-dos to see this in action. Notice that once you press the enter key, a new object containing the to-do item is pushed to the taskList array except if your to-do item is in fact an empty string.
Displaying our to-do items
Now that we can add add tasks to our taskList array conveniently, we need a way to render the each list item in the app. Remember we have already setup the skeleton for how each task will look like. All we need to do now is render the our list based on the contents of the taskList array.
The first step is to use the v-for directive to render the items in our taskList array.
<li v-for="task in taskList"></li>
In the earlier part of this tutorial, when we were setting up the skeleton of our app, I mentioned that the label element is where we will insert the text for each to-do item. So this is where we will place our mustache binding.
...
<label for="checkbox"></label>
...
All together now:
<ul class="list">

  <li v-for="task in taskList">

    <input type="checkbox" class="checkbox">
    <label for="checkbox"></label>
    <button class="delete">X</button>

  </li>

</ul>
What this means is that each task in our taskList array will be rendered inside an li element that contains a checkbox for marking the task as completed, a label for holding the text and a button for deleting items.
Here’s the current state of our app. Add some tasks to see it in action.
Feature 2 - Delete a single to-do item
We have already setup a button for deleting tasks which is displayes only when hovering on a task. Now, let’s register a new method that will be invoked when the button is clicked.
...
<button class="delete" v-on:click="removeTask(task)">X</button>
...
...
removeTask: function(task) {
  //$remove is deprecated in Vue.js 2.0. Do not use.
  this.taskList.$remove(task);

  //Do this instead.
  var index = this.taskList.indexOf(task);
  this.taskList.splice(index, 1);
}
...
Our button element triggers the removeTask method which takes one argument, task, which is the current array element being operated on.
Inside removeTask we used a built-in array extension in Vue called $remove which helps us remove an element from an array and trigger view updates.
Update: $remove is deprecated in Vue 2.0.
We grab the index of this task and use the splice() array method to delete it from the array.
Try it out, add some tasks and click the X button that appears when hovering over an item.
Feature 3 - Clear the whole list
This next feature is quite straightforward to implement. We need a way to clear the whole list once the Clear List button on the top panel is clicked.
<button v-on:click="clearList">Clear List</button>
Now let’s register the clearList method.
...
clearList: function() {
  //Setting taskList to an empty array clears the whole list
  this.taskList = [];
}
...
Remember taskList is where our to-dos are stored so all we need to do to clear our list is to set taskList to an empty array.
Feature 4 - Mark a single item as completed
Marking tasks as done is a common feature in any half-decent to-do app and ours is not going to be any different.
Remember we already set the checked property on each task to false when we add a new to-do item. We need a way to toggle it to true when a task is checked and vice versa.
We can do this by binding our checkbox to the checked property using the v-model directive.
<input type="checkbox" class="checkbox" v-model="task.checked">
That’s it. When a checkbox is selected, the checked property is toggled to true and vice versa.
Try it out:
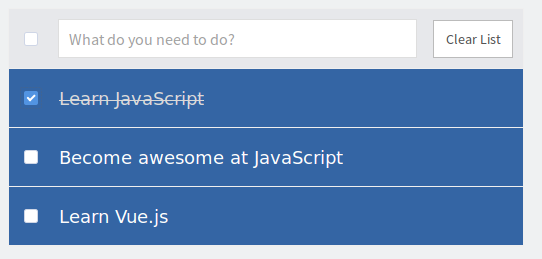
Now, we need to provide visual feedback in our app indicating that a task has been completed. Most to-do apps strike out the task and grey out the text so we’ll do something similar here.
I have added some rules in the css to grey out the label element when the to-do item in question has a class done on it’s li element.
...
.list li.done label {
  color: #d9d9d9;
  text-decoration: line-through;
}
...
So all we need to do is to add the done class to the li element when a task is checked and remove it when the task is unchecked. We will use another Vue directive to achieve this: v-bind.
Manipulating an element’s class is commonplace in Front-End development and with v-bind, we can dynamically toggle classes on an element based on computed properties in an object.
Let’s go ahead and toggle the done class on our li element by finding out if a task is checked or not.
<li v-for="task in taskList" v-bind:class="{done: task.checked}">
...

...
</li>
If task.checked returns true, the done class is enabled on the li element and vice versa.
Feature 5 - Mark all items as completed
For our final user story, we need a way to mark all to-do items as completed with one click. We will use the checkbox with the id of mark-all in the top panel to mark or unmark all items. Additionally, when we select all the checkboxes one by one, the #mark-all checkbox will also get selected.
Before we can select or unselect all items, we need a way to set the value of the #mark-all checkbox. We can do this by checking if there is at least one to-do item in our taskList array and if so, we will check if all the tasks are selected or not
We will watch for changes in our Vue instance using computed properties. Basically, they are used to change some data in the Vue instance based on some other data.
Let’s create a new property areAllSelected in our computed object that will continually watch for changes in our taskList array and change the value of #mark-all based on whether all the checked properties in the array return true.
...
computed: {
  areAllSelected: function() {
    //Check if every checked property returns true and if there is at least one to-do item
    return this.taskList.every(function(task) {
      return task.checked;
    }) && this.taskList.length > 0;
  },
}
...
The every() method tests whether all the elements in the taskList array passes the test implemented by the provided function and returns true if a truthy value is returned by the callback function otherwise it returns false.
Next, we will bind the checked property on the #mark-allto the value returned by areAllSelected like this:
<input type="checkbox" id="mark-all" v-bind:checked="areAllSelected">
What this means that if areAllSelected returns true, the checked property will be enabled on the element, otherwise it will be disabled.
Try it out. Add a few tasks and mark them as done one by one. You will see that once all the items have been marked as completed, the #mark-all checkbox will also be selected.
The final thing we need to implement is to select or unselect all items with the #mark-all checkbox.
To do this, let’s register a new method called selectAll:
...
selectAll: function(task) {
  //targetValue is set to the opposite of areAllSelected
  var targetValue = this.areAllSelected ? false : true;
  //we use a for loop to set the checked state of all items to the target value
  for (var i = 0; i < this.taskList.length; i++) {
    this.taskList[i].checked = targetValue;
  }
}
...
Finally, let’s use the v-on directive on our #mark-all element to summon selectAll.
<input type="checkbox" id="mark-all" v-bind:checked="areAllSelected" v-on:click="selectAll">
That concludes my tutorial. I hope it has helped you learn the basics of Vue.js and how you can use it to build web interfaces. Would love to hear some feedback so please say what you think.
If you liked this article, please share with folks who might benefit as well. This will ensure that it reaches as many people as possible.
Also, consider subscribing to my email newsletter so you do not miss future tutorials.
Thanks for reading.